Promoting your business with print puts you one step ahead of the competition. Well done, you. Choosing us to print them puts you another ten steps ahead, at least 😉 At The Printed Image we are dedicated to transforming your design into beautifully printed and finished collateral that will best represent your brand in the market.
If you already have the design for your marketing materials ready, you can send the files to us in just a few clicks. We do check every design before sending to the presses. If there are any red flags, we will contact you to make the necessary amends – our goal is to ensure that your materials look as incredible as you imagined them.
However, to speed things up, we put together a short list of the key elements to consider when creating the file that you send to us. If you need any help with this, we are just a click or a call away – give us a shout and we will be happy to help.

All files should be in CMYK
All printers are set up to output in CMYK colour mode – so your file should be set to CMYK as well. If you send us a file in RGB or Pantone, don’t panic, our system will automatically convert it to CMYK. The slight caveat is that the colours may alter very slightly. That’s natural and most of the times it’s barely noticeable – but if you want more control over colour output, converting the colours to CMYK is your best bet.
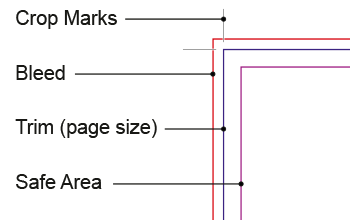
Include the bleed area
Imagine your material. If it’s a business card, the final size is 85x55mm. If it’s a poster, it could be A1 or A2. Now, imagine a border of 3mm on the outside of this material, all around it. Next, extend the design from inside your material to cover this ‘border’ as well – so basically you have the same colour background, or image, 3mm all around. This is called the bleed area. No relevant information should be placed in the bleed area, as it will be cut off from your material, but the idea is that it works as a safe area, avoiding white edges when your material is trimmed to size.
When sending us your artwork, please include the bleed area of 3mm all around for any materials.

Files should be 300dpi
DPI stands for dot per inch – quite literally, it’s the amount of colour dots on one inch of paper. If you have only a few, the image isn’t sharp as there aren’t enough ‘dots’ to make up a detailed image. That’s why, for print, files should be at least 300dpi. This will guarantee the print will look sharp and not pixelated.
A way to increase the resolution of a low resolution image is by reducing its size – this means the dots will get closer together and you could reach 300 of them in an inch, 300dpi. Enlarging the size of an image will reduce the resolution, as the dots will spread to fill the space of the new image size. Increasing resolution whilst keeping the same image size is possible, but not best practice, as the ‘space’ between the dots are usually filled with similar colours to them but it means your design will be very blurry and not defined. Best option is to choose an image that has high resolution at the size you need it.
Embed any fonts
When you create your artwork, you will pick a font that is available on your computer and that best works in your design. If the chosen font is a universal one, like Arial or Verdana, most computers will have it by default and anyone could open the file and see the same design you see, as the font will be recognised. However, if you are choosing a funkier font, chances are we will not have it installed in our system, meaning we won’t be able to see it correctly.
To ensure the fonts appear as they are intended, you need to embed them to your design – this way, we won’t need to have the font installed on our system, it will be a part of your file.
The best way to do this is by ‘creating outlines’, so your font will no longer be a font, but be a line instead – please note, we recommend that you save your original file as a font before transforming it to outlines, because once they are outlines, you can’t change the text easily.
Format
We accept files in PDF, JPEG, PNG and TIFF.
If you are printing double-sided, please upload one file with two pages to our website, one page with the design for the front of your material and the other page with the design for the back. Each needs to have the bleed area.
If you are printing brochures, send us each one file with single pages; the first page should be the cover and the last page should be the back cover.